How to Use the Python Turtle Library
March 26, 2024
KiindaLiinda / Linda G.
Tags:
CodingOverview
For Pi Day, I hosted a workshop on my Twitch channel during the Twitch Women’s Guild Pi Day Raid Train. This article goes over a quick tutorial on how to use the Python Turtle library, as well as additional resources if you want to explore more. Additionally, if you’re an educator who wants to use this workshop for a course, there’s a link to the workshop document at the bottom that you can share with your students. The document contains everything on this website, but you’ll be able to download it as a PDF so you can post it for your students, without them needing to visit this website.
Python’s Turtle Library allows us to use a variety of methods to create art using code! In this workshop, we will be learning how to create our own drawing of a Turtle, as well as learning a few other tools and tips to create unique patterns. The code used for this workshop can be found on my GitHub (linked at the end).
What You'll Need
If you want to do this locally on your device (installation required):
- Install Python (latest version) here.
- Install an IDE of your choice (I personally use Visual Studio Code which can be found here).
If you want to do this on the cloud (no installation required):
- Create an account on Replit.
- Create a new "Repl" using the "Python (with Turtle)" template.
Method Dictionary
We'll be using a variety of methods throughout this example. Here's the definitions and information about their parameters.
| Method | Parameters | Definition |
|---|---|---|
| pencolor(a) | a -> color (string or integer) | This method changes the color of the lines that our turtle makes. Think of it as the color of the outline. |
| begin_fill() | N/A | This method tells the turtle that it’s going to start drawing a shape. |
| end_fill() | N/A | This method tells the turtle that it’s going to close a shape. |
| speed(a) | a -> speed value (integer) | This method will change the speed in which the turtle is drawing. You get to see the turtle draw in real time and depending on the length of your code, it can take long to finish drawing. |
| setx(a) | a -> coordinate (integer or float) | This method will move your turtle to a specific x coordinate, while keeping the same y coordinate. |
| sety(a) | a -> coordinate (integer or float) | This method will move your turtle to a specific y coordinate, while keeping the same x coordinate. |
| left(a) | a -> degrees (integer or float) | This method will turn the direction in which your turtle is facing to the left by a certain amount of degrees. |
| right(a) | a -> degrees (integer or float) | This method will turn the direction in which your turtle is facing to the right by a certain amount of degrees. |
| forward(a) | a -> distance (integer or float) | This method will move your turtle a certain distance in the direction it is facing. |
| back(a) | a -> distance (integer or float) | This method will move your turtle a certain distance in the direction opposite to which it’s facing. |
| fillcolor(a) | a -> color (string, rgb values, or hex code) | This method changes the color that a shape is being filled with. |
| pensize(a) | a -> thickness (positive integer) | This method changes the thickness or width of the lines that the turtle creates with the pen, or the thickness of the outline of a shape being created. |
| dot(a,b) | a -> size (integer) and b -> color (string, rgb values, or hex code) | This method creates a dot at the location of your turtle and fills it completely with a color (no outline). |
| pendown() | N/A | This method tells the turtle to start drawing. Any movements after calling this method will result in a line being drawn. |
| penup() | N/A | This method stops the turtle from drawing. Used to move the turtle without creating accidental lines. |
| hideturtle() | N/A | This method hides the turtle (e.g. cursor) when it’s called. |
| showturtle() | N/A | This method shows the turtle (e.g. cursor) when it’s called. |
| turtle.done() | N/A | This method is called when our drawing is done. It stops the code, but keeps the turtle drawing window open so we can see what we created. Without this command, the code will complete executing and close immediately. |
Drawing a Turtle
We will start by creating a turtle. This turtle looks like this:
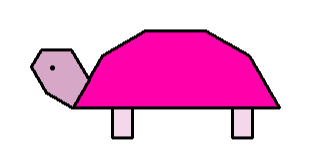
You’ll get the opportunity to customize the colors of your turtle! This exercise will allow you to test how creating shapes work, but the exact code for my turtle will be shown at the end. Good luck!
Steps:
Create a new file or Repl. On Repl, title it "Turtle Drawing". Locally, title it "TurtleDrawing.py".
At the top of your file, include the following line:
| import turtle |
|---|
This line will allow us to use the methods in the Turtle library that I mentioned above.
Next, we're going to give our Turtle a nickname. Why? Without a nickname, anytime we want to call a method, we'll need to have the following before the method call:
| turtle.Turtle() |
|---|
With a nickname, we will shorten this code and make it easier to read and write.
To do this, include the following code:
| name = turtle.Turtle() |
|---|
Replace "name" with the name of your turtle! For example:
| john = turtle.Turtle() |
|---|
NOTE: The name of your turtle is case-sensitive, meaning that if the name has a variety of casing (upper/lower case letters), then having a different variety will cause your code to throw an error (e.g. John vs. john).
Next, we're going to make sure we can test our code.
Include the following code at the end of your program:
| turtle.done() |
|---|
This will line will ensure you can see your creation after the code is done running. Make sure all of the code you write fore your turtle is above this line. This line should always be the last line of your program.
Next, we're going to set up the turlte. We're going to give it an outline color and a pen thickness.
Include the following code:
| name.pencolor("black") |
|---|
| name.pensize(3) |
Replace name with the name of your turtle. You can change the color of the outline to whatever color you want. Remember to use the format described in the methods dictionary above. You can change the thickness of the pen to whatever value you want, but I recommend keeping it a relatively thin number just so it's easier to see and use.
Next, we're going to draw the shell of the turtle. Start by selecting what color you want the shell to be.
Include the following code:
| name.fillcolor("#ff00aa") |
|---|
Replace name with the name of your turtle and replace #ff00aa with whatever color you'd like. By the way, the fillcolor() method will only work if we're creating a shape. I'll show you how to do this.
Include the following code:
| name.begin_fill() |
|---|
Replace name with the name of your turtle. The begin_fill() method lets us start creating a shape. From here, experiment using the forward(), back(), left(), and right() methods to create the shape of the shell. Oce your shell is done, include the following code:
| name.end_fill() |
|---|
Replace name with the name of your turtle. The end_fill() method will tell the turtle to close the shape and fill it with the color we selected above. To ensure this happens, you can start by moving your turtle to a specific coordinate using the setx() and setu() methods and then moving your turtle back to those coordinates at the end of your shape drawing. You can use penup() and pendown() to move your turtle without creating any additional lines, if you choose to.
Use these tools to then create the head and legs. You can customize the color of these parts, since they are their own shapes. You can create an eye for your turtle using the dot() method. You can run your code as many times as you want to experiment with values. Make sure you save the file first so that your changes will affect the test run.
View Source Code on GitHubMaking Patterns and Designs of Your Own
We'll be using loops to show how you can create more complex designs, like the one shown below:
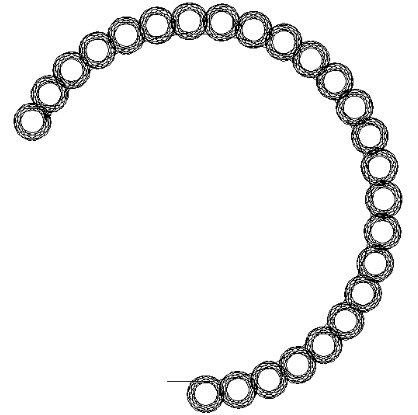
For example, we will be utilizing for-loops. I will briefly go over what a for-loop is, but if you are familiar with it, you can skip that section.
For-Loop Introduction
For-loops are a type of structure used in Python and most programming languages to repeat our code under a certain condition. In early examples, you'll typically be looping code a certain number of times, rather than using a condition statement.
Loops can often give you errors. For the purpose of this example, I recommend you only put commands relating to color change and movement inside the loops.
The syntax for for-loops are as follows:
| for x in range(5): |
|---|
[insert code here] |
"x" is the loop variable. It starts at 0 and iterates until it reaches the value that's inside the range() method, which in this case is 5.
Python uses indents to group code. When we're using ofr loops, we need the code that's inside the loop to be indented once. The colon (:) tells the program that we're going to follow with a code block, which is indicated by the indent. When we want to end the loop, we just remove the indent.
This looks like this:
| for x in range(5): |
|---|
this code is inside the loop |
this code is inside the loop |
| this code is NOT inside the loop |
| this code is NOT inside the loop |
If you randomly add an indent without a loop present, you'll get something called an "indentation error." This looks like this:
| for x in range(5): |
|---|
this code is inside the loop |
this code is inside the loop |
| this code is NOT inside the loop |
| this code is NOT inside the loop |
this code will throw an INDENTATION ERROR! |
You can also put loops inside of other loops! This is called a nested loop (or nested for-loop). These are written like this:
| for x in range(5): |
|---|
this code is inside the first loop |
for y in range(3): |
this code is inside the second loop |
You need to use a different loop variable for the second loop. In this clase, "x" is only for the first loop and "y" is being iterated for the second loop. You need to indent the code inside the second loop twice so that the program knows it belongs to the second loop.
The first loop repeats the code 5 times and the second loop repeats 3 times. However, since the loop is nested, the second loop actually runs a total of 15 times. Everytime loop 1 runs, the second loop runs for 3 times.
- Loop 1 runs for the first time with Loop 2 running 3 times
- Loop 1 runs for the second time with Loop 2 running 3 times again (6 total)
- Loop 1 runs for the third time with Loop 2 running 3 times again (9 total)
- Loop 1 runs for the fourth time with Loop 2 running 3 times again (12 total)
- Loop 1 runs for the fifth time with Loop 2 running 3 times again (15 total)
You can also run code inside the first loop after the second loop without an error. It looks like this:
| for x in range(5): |
|---|
this code is inside the first loop |
for y in range(3): |
this code is inside the second loop |
this code is inside the first loop |
this code is inside the first loop |
| this code is outside of the loops |
Using For-Loops on Turtle Methods
You can make the turtle run code many times like this:
| for x in range(5): |
|---|
name.forward(50) |
name.right(30) |
Replace name with the name of your turtle. This code will move your turtle 50 steps forward and turn 30 degres to the right 5 times.
This is what that code loops like without a loop:
| name.forward(50) |
|---|
| name.right(30) |
| name.forward(50) |
| name.right(30) |
| name.forward(50) |
| name.right(30) |
| name.forward(50) |
| name.right(30) |
| name.forward(50) |
| name.right(30) |
For-loops allow us to make the code shorter. It's especially useful if we're going to make designs like the one I made above, where the pattern is symmetrical.
You can also create nested for-loops with Turtle methods as well. Take a look at this example:
| for x in range(5): |
|---|
name.forward(50) |
name.right(30) |
for y in range(3): |
name.forward(20) |
name.left(30) |
Replace name with the name of your turtle. This code will make your turtle move 50 steps forward, turn 30 degrees to the right, and then move forward 20 steps and move to the left 30 degrees three times in a row.
This is what the code will loop like without the loops:
| name.forward(50) |
|---|
| name.right(30) |
| name.forward(20) |
| name.left(30) |
| name.forward(20) |
| name.left(30) |
| name.forward(20) |
| name.left(30) |
| name.forward(50) |
| name.right(30) |
| name.forward(20) |
| name.left(30) |
| name.forward(20) |
| name.left(30) |
| name.forward(20) |
| name.left(30) |
| name.forward(50) |
| name.right(30) |
| name.forward(20) |
| name.left(30) |
| name.forward(20) |
| name.left(30) |
| name.forward(20) |
| name.left(30) |
| name.forward(50) |
| name.right(30) |
| name.forward(20) |
| name.left(30) |
| name.forward(20) |
| name.left(30) |
| name.forward(20) |
| name.left(30) |
| name.forward(50) |
| name.right(30) |
| name.forward(20) |
| name.left(30) |
| name.forward(20) |
| name.left(30) |
| name.forward(20) |
| name.left(30) |
This looks crazy right? Hard to read and if you make a logical error (a type of error where your code works and isn’t wrong, but you’re getting a result that’s different from what you want), you might not know where to even look. Loops help us condense this code to make it easier to control.
Play around with loops and nested loops to create some cool designs of your own! You can also use nested loops to create multi-colored designs. Take a look at this:
| for x in range(5): |
|---|
name.pencolor("red") |
name.forward(50) |
name.right(30) |
for y in range(3): |
name.pencolor("blue") |
name.forward(20) |
name.left(30) |
The code above will create a design that changes between red and blue when loop 1 runs. All of the contents of loop 1 will be in red and all of the content in loop 2 will be in blue. If you want to do something a little more advanced, you can make a list of different colors you like and have the program to randomly pick colors. I’ll add a resource at the bottom with a resource for randomizing with Python.
View Source Code on GitHubConclusion
You now know how to make art with Python! Cool right? Share what you’ve made with me on social media by tagging me in your post (@ KiindaLiinda). Below are some resources:
- Python Turtle Documentation can be found here. This website goes over all of the methods that are included with the Turtle library. It includes, some basic examples, how-tos, and more.
- GeeksForGeeks Random Select can be found here. This website goes over how to randomly select a value from a list. You can use this to generate random color values from a list. There’s other programs that can randomly generate hex colors that you can look up depending on what you’re trying to achieve.
Download PDF Instructions
KiindaLiinda / Linda G.
March 26, 2024